Category Archives: Netbeans

Maven error 501 (HTTPS)

If you installed an old version of Netbeans and trying to use maven, it is possible that you are getting error 501 (see this post).

This can happen because Netbeans does use an embedded maven version but it is not up to date.

To solve the problem install Maven system and configure Netbeans to use the system version instead of the embedded one:

Step 1 – Install maven
sudo apt install maven
Step 2 – Configure netbeans
Netbeans -> Options -> java -> Maven: set up : /usr/share/maven

Netbeans C/C++ template with Valgrind and -Wall

Netbeans is a great free IDE, one I recommend to all beginners.

For C/C++ coding, it has one important drawback though: -Wall is not selected by default, which is something absolutely required for beginners.

For this reason, I have created my own template (-wall, run at external terminal, valgrind configuration etc) which is available here

In the following page you can find how to create and use one of your own:

https://blogs.oracle.com/seapegasus/entry/tip_create_your_own_project

Basically you point the IDE to an existing NetBeans project and tell it to use that as a template. You use a module project as a wrapper: This will allow you to turn the template project into an NBM file (“NetBeans Module”) that can be installed into the IDE like a plugin. After installing the custom plugin, the template project will appear in the “New Project” wizard. This is how you do it:

  1. Take a NetBeans project that you want to be the template project, and open it in the IDE. Let’s call it FooApp.
  2. Create an empty NetBeans Module project. Name it something recognizable (such as FooAppTemplate or whatever).
  3. In the Projects window, right-click the empty module project. Create a new file by choosing New > Other > Module Development > Project Template from the context menu.
  4. Use the Template Wizard to configure the template. Point it to the template project FooApp and choose a category (Java SE, Java EE, Java ME, Ruby, etc).
  5. Here comes the important part – you save the template as an NBM file. Right-click the module project in the Projects window, and select Create NBM. Look into the Output window to see where the file was saved (for instance FooAppTemplate/build/myorg-fooapptemplate.nbm).
  6. To install the template into the IDE, go to Tools > Plugins > Downloaded. Click Add Plugin, browse to your NBM file and install it. If you give the NBM file to other developers, that’s how they install the template.
  7. (Alternatively, right-click the module project in the Project window and select “Install in Development IDE”. This is another way to install it for somebody who has the module project still open.)

Netbeans 8.2: “not all requested modules can be enabled” or java.lang not found

Symptoms:

  • In Netbeans 8.2, the message “message “not all requested modules can be enabled” is displayed on start up
  • In newer versions, the java lang package is not found

Both symptoms mean that Netbeans has not been configured to use the proper JDK.

To find the path of the installed JDKs you can type:

$ update-java-alternatives -l

A sample output would be:

java-7-oracle 1078 /usr/lib/jvm/java-7-oracle
java-8-oracle 1081 /usr/lib/jvm/java-8-oracle

What you have to do is locate the file netbeans.conf and set the netbeans_jdkhome variable to one of the paths displayed above.

The easiest way to find netbeans.conf is to run the following command:

find / -name netbeans.conf 2> /dev/null

This may take a while since it will search the whole disk.

You could also look at the following standard directories:

  • /home/netbeans-X.Y/etc/netbeans.conf
  • /usr/local/netbeans-X.Y/etc/netbeans.conf

After you have found netbeans.conf, you perform the following steps:

  1. open netbeans.conf with any text editor you like
    1. set netbeans_jdkhome variable to point to the proper location, eg:
netbeans_jdkhome="/usr/lib/jvm/java-8-oracle"

References:

https://askubuntu.com/questions/750514/netbeans-not-all-requested-modules-can-be-enabled
Configure Netbeans IDE for C/C++ (Windows)

Linux can compile C/C++ with Netbeans out of the box, as long as you have the compiler installed (like gcc and g++).

Usually the following commands are enough:

sudo apt-get install build-essential
sudo apt-get install valgrind

In Windows you have to do this manually:

  1. From https://sourceforge.net/projects/mingw/:
    1. Download mingw
    2. Install it to the suggested (default) directory. If you want to use a custom directory, make sure the selected path does not contain spaces or other special characters (like greek letters etc)
    3. From the Mingw Installation manager, click and install at least the following packages:
      1. mingw-developer-toolkit
      2. mingw32-base
      3. msys-base
      4. mingw32-gcc-g++
  2. Press winkey+pause to load Windows Settings Manager. At Advanced system settings →Advanced→environment variables:
    1. Add the following text at the end of the PATH environment variable (not user variable):
      %SystemRoot%\system32;%SystemRoot%;%SystemRoot%\System32\Wbem;%SYSTEMROOT%\System32\WindowsPowerShell\v1.0;C:\MinGW\bin;C:\MinGW\MSYS\1.0\bin

  1. At Netbeans→Tools→Plugins:
    1. check C/C++ feature and activate it
  2. Create a new C++ project and run it:
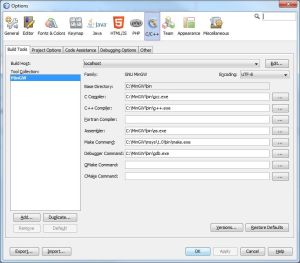
    1. From the “Resolve Missing native tools” just click “Restore defaults”. It should autodetect the settings. If it fails there is a sample configuration at the end of the post.
  3. Restart Netbeans
  4. Preferably, logout and login too.

If you have problem configuring Mingw, here is a sample of a handy configuration (mingw at default directory):

mingwnetbeans